Struggling to get your head around mountain bike geometry? Here's everything you need to know
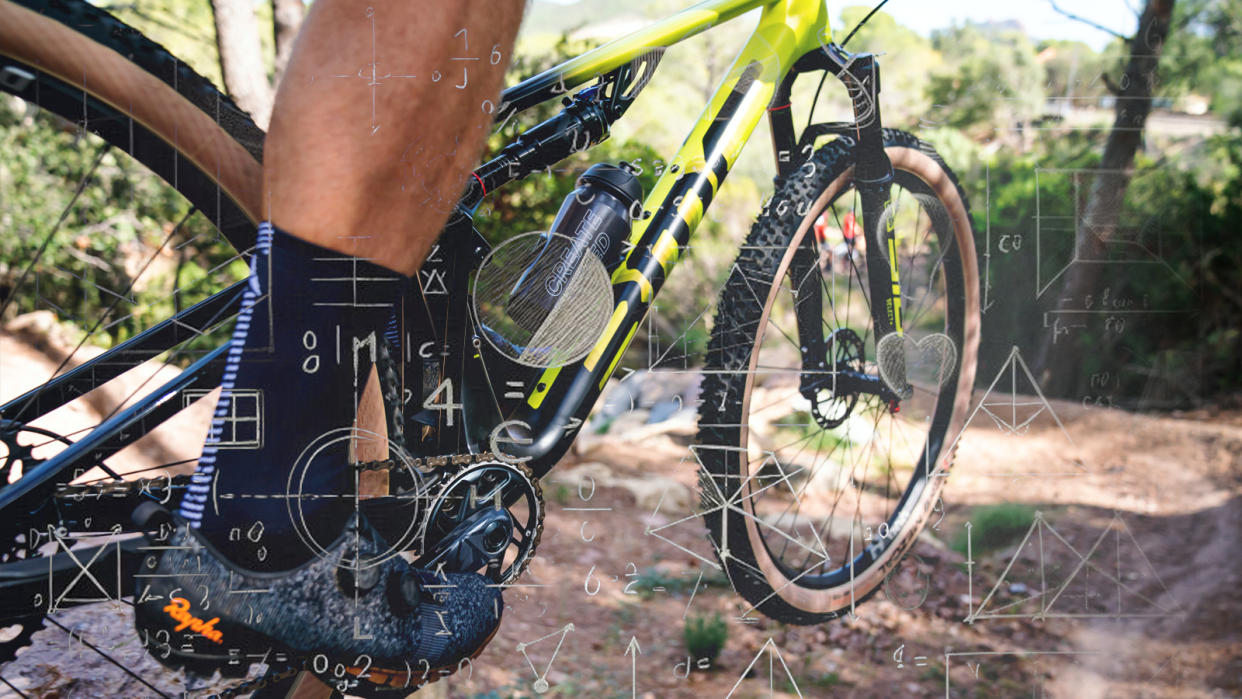
A mountain bike's geometry is the biggest contributing factor to how it performs. It doesn’t matter how supple your suspension is, how grippy your tires are, or how many gears you have, if the geometry isn’t up to the job your bike is going to be uncomfortable and hard to control out on the trails.
What’s more, although there are ways to manipulate the geometry of a bike, most measurements are pretty much set in stone or require some complicated workarounds to achieve the desired numbers without throwing off something else. When choosing a new bike, geometry should be one of your top considerations.
Geometry is an extremely complicated subject too, so if you’re new to mountain biking or more interested in hitting the trails than pouring over charts, it can be confusing. To simplify the mysteries of geometry, here I'm covering important measurements, what they mean, and how they affect the ride feel of a bike.
1. Which geometry numbers matter?
Look at any manufacturer's geometry chart and you're usually faced with a bamboozling amount of numbers, but what do they all mean? In no specific order, let's take a look at some of the key players:
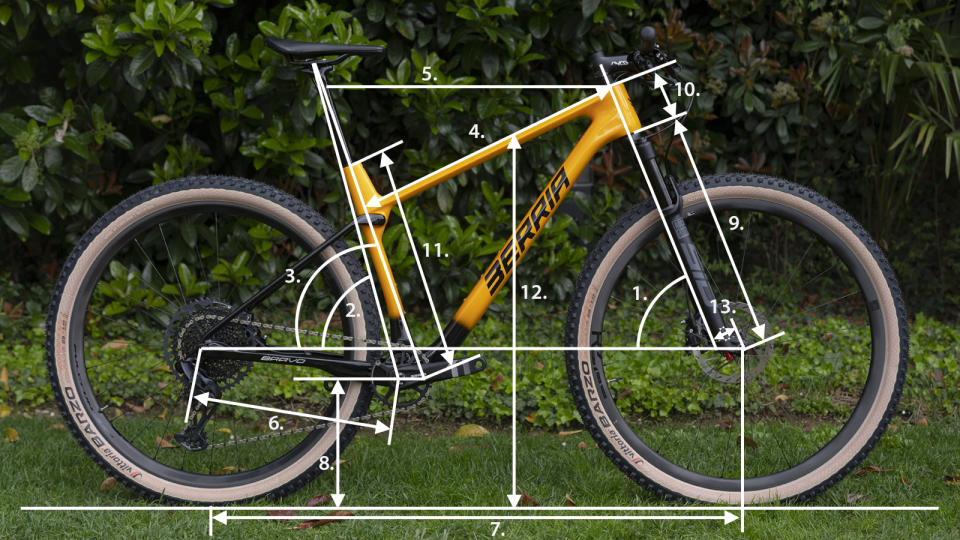
1. Head angle
This is the angle of the fork and will affect the stability and handling of a bike. A slacker angle will give slower more stable handling at high speed, while a steeper angle will give more precise cornering characteristics at slower speeds.
2. Effective seat tube angle
If you draw a line between the top of the seat post down to the bottom bracket, the angle of this line in relation to the ground is the effective seat tube angle and will affect your pedaling comfort and position on the bike. A steeper effective seat tube will move weight forward improving front wheel control on steep climbs but putting more weight on the hands when riding on flatter terrain.
3. Actual seat tube angle
This is the physical angle of the seat tube.
4. Actual top tube
The actual top tube measurement is the length from the head tube to the seat tube.
5. Effective top tube
The effective top tube is measured horizontally from the head tube to the seatpost.
6. Chainstay length
Sometimes referred to as rear center, this is measured from the bottom bracket to the rear axle. Bikes with shorter chainstays generally feel more playful, agile, and easier to manual and bunny hop. Longer chainstays usually make a bike feel more stable and balanced by increasing the wheelbase.
7. Wheelbase
The distance between the front and rear axles. A larger wheelbase will improve stability but reduce agility on tight trails.
8. Bottom bracket height
The height of your bottom bracket from the ground. Too high and the bike will feel awkward in the corners and unstable on fast rough sections but too low and you risk clipping cranks and chainrings on trail features.
9. Axle to crown (A2C)
The measurement between the axle and the crown of the fork. This is only important if you're looking to buy a new suspension fork for your bike.
10. Head tube length
The length of the head tube.
11. Seat tube length
The length of the seat tube and determines the length of the dropper post that can be fitted.
12. Stand-over height
This is the height of the top tube, it’s important to know how much clearance you have when standing over the bike to avoid any undercarriage impacts should you need to put your feet down.
13. Fork rake/offset
The distance of the axle from the steering axis (aka steerer tube), fork brands offer ranges from 37mm up to 51mm. Like axle to crown, this is only important to consider when changing your fork to ensure your bike's proper handling is maintained.
2. But what do these numbers actually mean?
To try and quantify these geometry numbers and make them somewhat comparable between bikes there are some other geometry measurements to be considered:
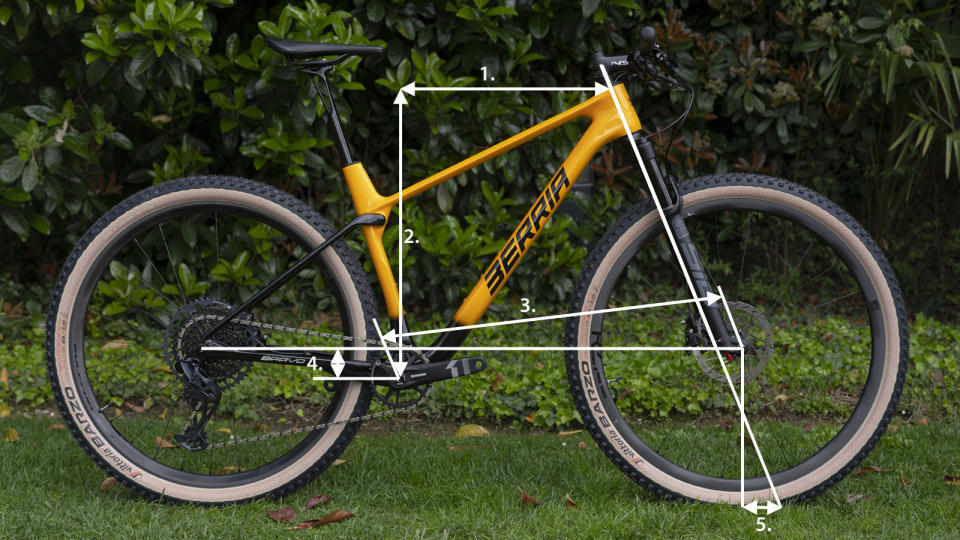
1. Reach
Top tube length doesn’t tell you much as different bikes have different top tube and seat angles. To combat this ‘reach’ was devised to give a more universal measurement. Reach is the horizontal distance from the head tube to the center of the bottom bracket and will indicate how a bike will feel when standing on the pedals. Many will consider this a key geometry metric when sizing, although it also doesn’t account for seat tube angle so don’t take it as gospel.
2. Stack
This is similar to reach in that it helps standardized bike fit. The measurement is taken from the center of the bottom bracket to the top of the head tube.
3. Front and rear center
I have already mentioned the rear center measurement, but there is also a front center measurement from the bottom bracket to the front axle. When contrasted with the rear center it helps indicate a rider's weight distribution when standing on the pedals – although it's skewed by top tube length, head angle, and fork length which has a greater effect on ride feel.
4. Bottom bracket drop
This is the opposite of the bottom bracket height, measuring from the wheel axle down to the bottom bracket. Why do you need both? The bottom bracket drop gives a more accurate indication of how a bike will ride, a large bottom bracket drop will give you the feeling that you are standing in the bike, while a small bottom bracket drop figure will feel like you are on top of the bike.
5. Trail
Trail is one of the most complicated and confusing of all geometry figures and is easily a subject on its own. Essentially trail is the measurement between the front tire's lowest point and where the projected steering axis meets the ground. Trail has a significant effect on handling and is manipulated by the head tube angle, tire size, and fork rake. Although head tube angle is often touted as the indicator of how a bike will corner, the trail gives a true representation of the handling characteristics. High trail numbers will give more stability at speeds but the front end can feel like it’s flopping into corners, whereas smaller trail numbers will feel more precise in corners but less stable.
3. So that's MTB geometry numbers sorted then?
Well not quite, the numbers on paper are only half the picture as they don’t work in isolation. When designing a bike's geometry, changing one number will affect other measurements so finding the perfect geometry is a balancing act. The components fitted to the bike can also have a huge influence on geometry and how these numbers affect how a bike rides. Buckle up and let's get into it.
Relationship between seat tube angle and reach
I have already touched on why reach should be taken with a pinch of salt, and while reach is a useful measurement, it doesn't take into account the seated position on a bike. A slacker seat tube angle will increase the distance from the saddle to the handlebars. If you're sizing a bike for pedaling all day, a considered combination of top tube length and seat angle will give a better idea of how a bike will fit.
Head angle, rake, wheel size, and trail
Although the trail figure is the best indication of handling characteristics, it’s a combination of three different measurements and manufacturers can manipulate these to achieve the desired ride feel. Just because a bike has a slack head angle doesn’t mean it will have a high trail number as the wheel/tire size and fork rake can reduce the trail number and vice versa.
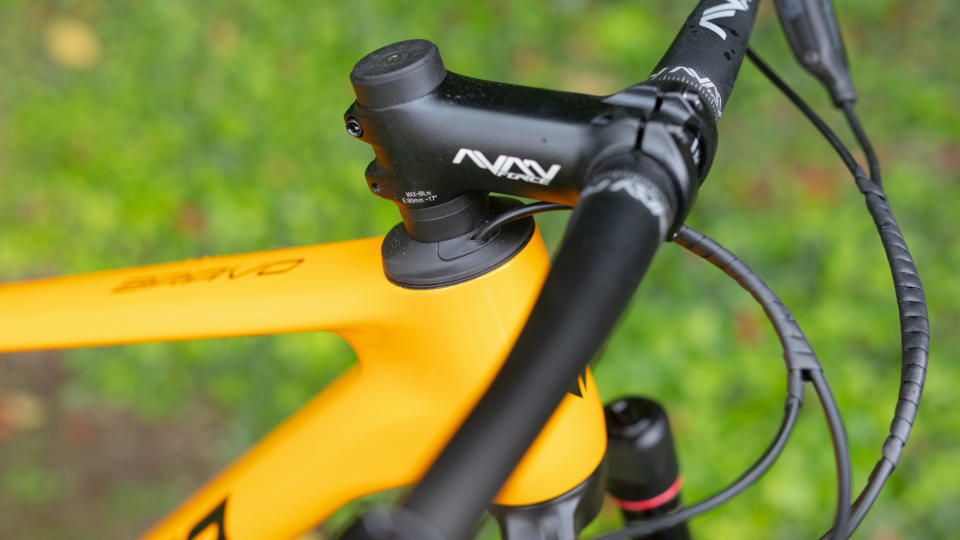
Fork length/stem/handlebar and stack height/reach
Manufacturers usually only recommend differing from the standard fork travel by 10mm either way as fitting a fork that is too long (or too short) can have dire effects on how a bike rides. For example, increasing the A2C by 10mm changes the head angle and seat angle by roughly 0.5 degrees. It will also effectively shorten your reach, increase the stack height, and lift the bottom bracket too.
Cockpit/saddle position affecting seat angle/reach
Some geometry numbers can be manipulated by adjusting components. Saddle setup can be adjusted, moving it forward on its rails to effectively shorten reach. Your stem and handlebar setup can also be changed to adjust the stack height and reach – although this can have rippling effects on your bike's comfort and handling.
Rear wheel size and BB height/reach
Have you ever wondered why some 29er bikes are approved for mullet setups (29 front 27.5 rear) but others aren't? Surely it's just a case of bashing a smaller rear wheel in and letting rip, right? In some cases this is true, but other bikes may run into issues. Switching to a 27.5in rear wheel will lower the axle height by roughly 19mm (depending on tire size) which will in turn lower the bottom bracket by around 10mm, slacken the head and seat angle by roughly a degree, and shorten the reach.
These days bikes come with built-in geometry adjustments like angle-adjusting headsets and flip-chips, allowing the rider an element of tunability to find their geometry sweetspot. Flip-chips are often positioned on the suspension linkage and are usually used to tweak bottom bracket height, head angle, and seat angle. They can also be used to maintain geometry when switching between 29er and mullet (29/27.5in) wheel setups or change chainstay length. Angle adjusting headsets do exactly what they say on the tin, adjusting the head tube angle by rotating an eccentric headset or switching out headset cups in the head tube to give up to around 2 degrees difference.
We also assume manufacturers have measured their bikes' geometry accurately and in a way that's comparable to other bikes. Have they even measured the production frames or are they simply pulling the numbers from the design drawings? Some brands will measure a bike in an unloaded position while others will measure with the suspension at the recommended sag point. Spec changes across different models in a range will also affect a bike's geometry but may not be accounted for, although the geometry differences are usually small. Potential variations in manufacturer measurements are why it’s important not to get too hung up on small differences between bikes.
4. So what geometry is good for mountain biking?
A few millimeters here and half a degree there might not seem like much, but even small changes to the geometry of a bike can have a significant effect on how a bike rides. However, mountain bikes are very dynamic machines so I think it's important that we don’t get hung up on the details and comparisons without real-world testing. For example, a full-suspension bike might have a high bottom bracket on paper, but when you account for the recommended suspension setup, in reality it may be lower than a bike with a lower sag setting.
It's also important to remember that geometry is often discipline-specific as well, so while a 66-degree head angle would be considered fairly radical for a cross-country bike, a downhill bike with the same head angle would be deemed unrideable.
With that in mind, let's take a look at some general geometry numbers for the types of riding you might be interested in.
Cross-country geometry
Cross-country geometry took a long time to catch up with the longer, slacker, lower ethos, but the most recent crop of cross-country bikes are now just as capable on the downs as they are on the ups. Head angles are usually between 67.5 and 66 degrees. Stems are shortening and reaches/wheelbases are increasing to roughly 450mm to 465mm for a medium bike. Sub 440mm chainstays help with maneuverability on tight turns and 75 to 77-degree seat angles are designed for a more optimized long-distance pedaling position.
You still get more classically inspired cross-country bikes and they still serve a purpose. While bikes like the Canyon Exceed CF7 with its steep 69-degree headangle and short reach can’t keep up with more aggressively shaped bikes on tough trails, they can still be a hoot to ride on longer, mellower trails.
Trail geometry
Trail bike geometry is frankly all over the place as the term trail bike has become a bit of a catch-all for everything between cross-country and enduro. Geometry reflects this with bikes like the 120mm Scor 2030 featuring enduro-inspired geometry, while the 130mm YT Izzo is more up and down orientated. Generally, trail bikes will have a head angle between 66 and 64 degrees with seat angles of around 78 degrees to improve climbing on steep gradients. Reach numbers can span between 450mm up to 480mm for a medium and chainstay length can be equally as broad.
Enduro geometry
Enduro bikes were the proving ground for what we would call modern MTB geometry. Bike brands experimented with longer reaches, slacker head angles, and longer chainstays to increase descending stability while still maintaining pedaling ability. Enduro head angles have settled around the 63 to 64-degree mark, paired with similar seat tube angles as trail bikes. Reach can vary from very long to surprisingly short depending on the brand, the flexibility of bike sizing, and rider preference. While most medium-size riders will look for around a 470mm reach, some pro racers will size down to enhance cornering agility.
Downhill geometry
Downhill bikes are very specialist pieces of equipment designed for one purpose only, descending the roughest tracks as fast as possible. Slack head angles, long wheelbase, and long chainstays are all used to contribute to the bike's stability. Downhill bikes often feature a huge amount of adjustment as well, giving riders the option to tweak all manner of geometry figures including head-angle, stack, bottom bracket drop, chainstay length, and reach to optimize a bike to a track or riding style.
Now you have a good understanding of what all the numbers mean and the effects they have on how a bike rides, how do you know what geometry and bike size is best for you? And can a bike's geometry be modified to make it better? Stay tuned for part two of this article coming soon.

