How to create a stylised toon character with Cinema 4D
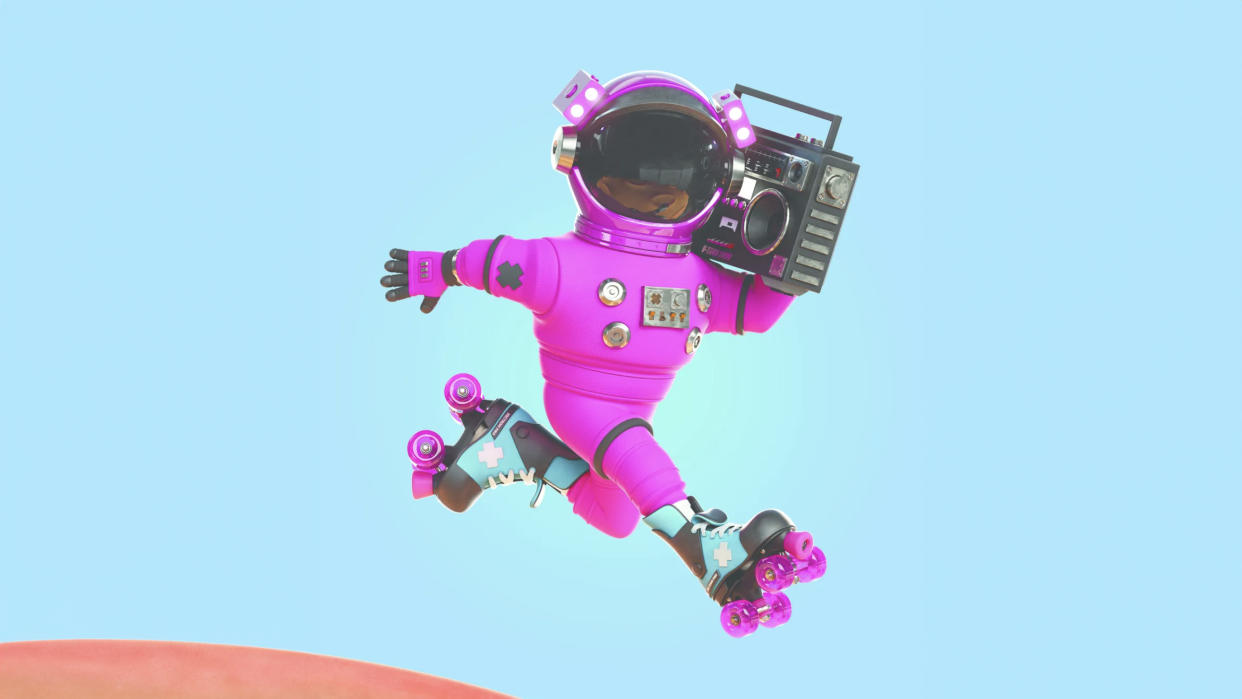
In this Cinema 4D tutorial, I’ll break down the character creation process from the very first polygon right through to the last. During this process you’ll gather an overview of the approach I take to stylised character design and modelling inside of Cinema 4D, using a handful of tools and simple but effective techniques.
While I’ll be using Cinema 4D in the tutorial, the techniques used and the thought process behind them are universal, so there’s no need to worry if you use a different software package, such as 3ds Max. Though the tools may be slightly different, the fundamentals will remain the same. If you want to learn more about CInema 4D, you can check out Paul Hatton's Cinema 4D: everything you need to know breakdown, as well as his Cinema 4D 2023 review. If you're keen and need to upgrade your kit, read these guides to the best laptops for 3D modelling and the best drawing tablets.
I’ll be delving into using subdivision surface modelling with a combination of both the poly-by-poly and box modelling techniques to create our stylised character. Each are more general techniques and principles that you can utilise when creating your own models.
As an artist that’s spent over a decade within the VFX industry creating fun, vibrant characters for animation, advertising and toys, I’ve tried various different approaches to character design and modelling, and have settled on the techniques that will be discussed in this tutorial.
Create a stylised toon character in Cinema 4D
I’ll break our character down into parts; modelling them from the head down while focusing on developing base forms and clean topology, before adding more details and discussing why doing things this way can be beneficial when designing the structure of your characters.
I could write about this stuff all day, but I won’t because I want you to live your life too! We won’t spend too much time covering all of the specific tools or functions, but rather summarise the process that can then be used across platforms. Let’s get into it.
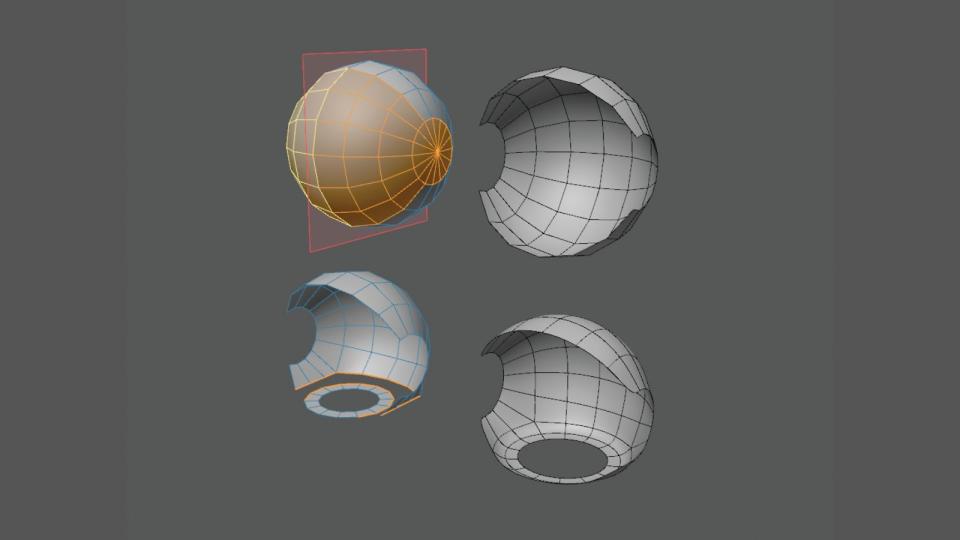
01. Modelling the helmet

(Image: © Vectron3D)
When modelling I always go for the head first. To start, open Cinema 4D and grab a standard sphere. I set the rotational segments count to 16 and then press ‘C’ on the keyboard to make it editable. I place this underneath a subdivision modifier, but keep that modifier off for now.
Press ‘R’ and rotate the sphere 90 degrees on its Z axis. The next step is made easier by enabling Symmetry with the butterfly icon in the menu. Pick the appropriate axis and planes to mirror your work to each side.
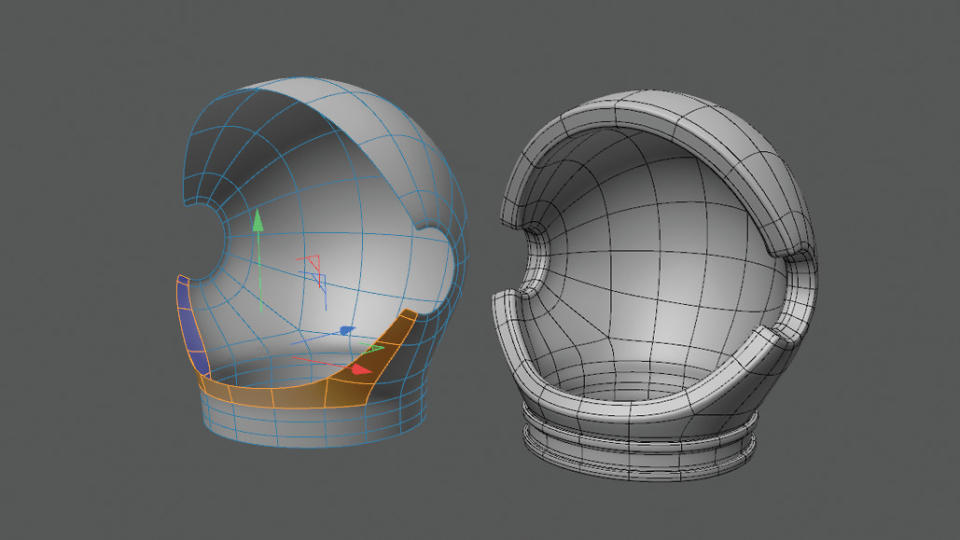
02. Defining the form
(Image: © Vectron3D)
Press ‘9’ for the Select tool, pick the group of polygons on the side of the sphere and then split that section from the mesh by pressing ‘U’+’D’. You can hide it for now, but we’ll need it shortly.
Delete the polygons that you originally selected from the sphere. Now Repeat this step on the bottom of the sphere.
Grab a disc from the Primitives menu and give it 14 rotational segments and at least two disc segments, then make it editable. Position it underneath the sphere and combine both objects in the Object Manager. Loop Select the bottom edges of the sphere and the corresponding edges on the disc. Using the ‘Stitch and Sew’ tool, click and drag the edges of the disc to weld them to the cylinder. Add an additional edge loop with the Loop Cut tool.
03. Adding thickness
(Image: © Vectron3D)
Use the Polygon Pen to fill the front section as highlighted. Select the bottom edge of the sphere and extrude it downwards. With the Loop Cut Knife tool, add two new edge loops. We’ll use these next to create the collar.
Add thickness by selecting the entire mesh and extruding with caps. Loop Select the middle ring of polygons we made earlier and repeat the extruding process, but this time without caps. Now add supporting edge loops with the Knife tool to tighten the edges as required. Turn on Subdivision to test the smoothing results.
04. Creating the extra parts
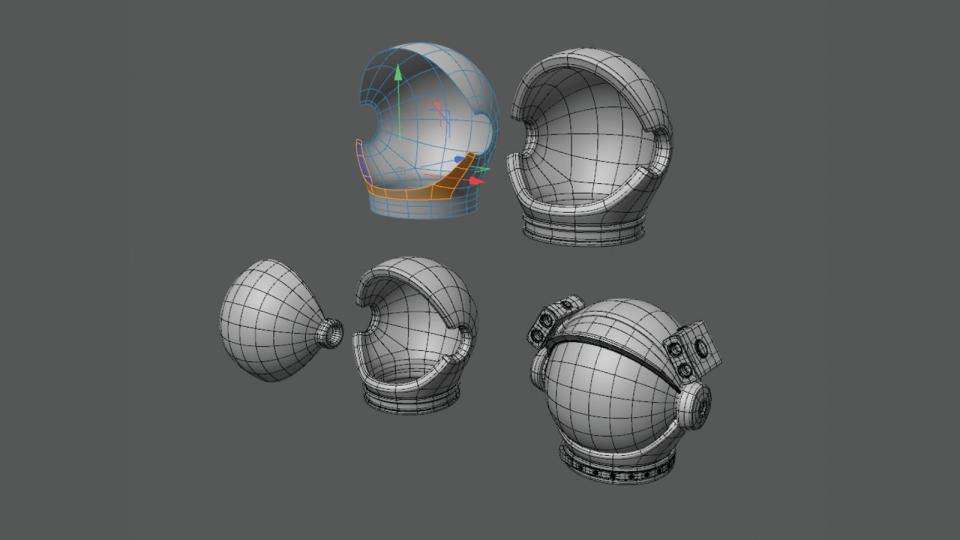
(Image: © Vectron3D)
Now we have our base mesh, we can start to add details like the visor and head lamps with the help of something prepared earlier. Unhide the mesh we split, which will form the basis for our visor. Select the poles at either end of the mesh inset by pressing ‘M’+’W’, clicking and dragging before deleting the centres. Next, repeat the steps from earlier to add thickness to the visor. Finish off by extruding discs with caps for the covers on the side of the visor and cubes for the lamps.
05. Building the torso
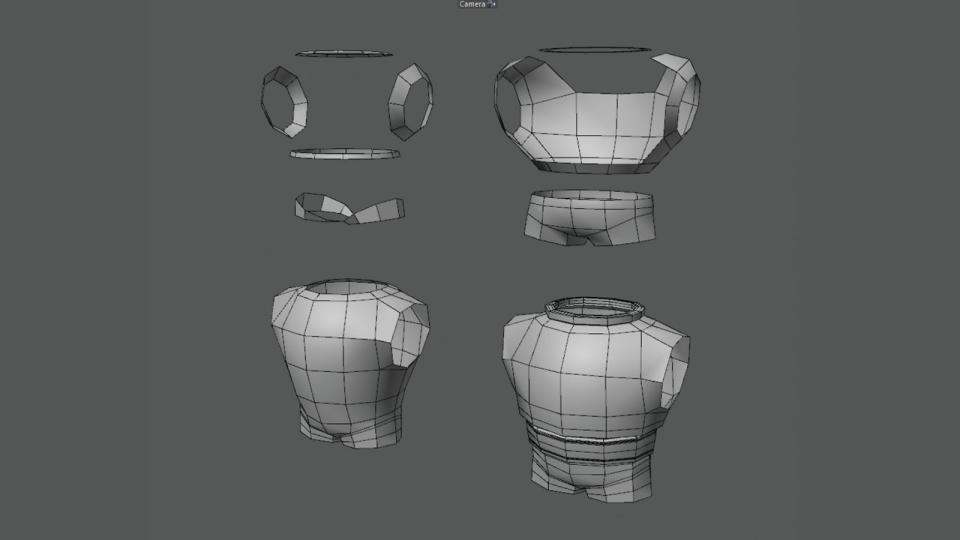
(Image: © Vectron3D)
I start here by taking a disc with 12 rotational segments and two disc segments, which will need to be made editable. Select the middle polys with the Selection tool and delete them, as this will be for the neck.
A then add another disc, this time with eight rotational segments, and again remove the centre. Rotate it around 90 degrees and move it into position next to our existing disc; this is where the shoulders will connect. Repeat this for the groin area.
Use the Mirror tool from the Character menu to get everything symmetrical once its all in place. Combine the objects by selecting them in the Object Manager and running a ‘Connect Objects and Delete’ command.
Now in Edge mode, switch to the Polygon Pen and fill in the gaps. Extrude the belt section from the waist, and the collar from the disc at the top.
06. Reviewing the topology
(Image: © Vectron3D)
Our character is starting to take shape, so this is a good time to review our topology. Though we won’t be rigging the character for the purpose of this tutorial, it’s still a good idea to keep things tidy with clean loops and evenly distributed geometry. Not only does it make it easier for you to work on, but also for others in the pipeline, namely the riggers.
Subdivision works best when modelling with quads, especially for anything organic or that will need to deform. Adding the odd n-gon or triangle probably won’t make or break anything, but it does have the potential to cause issues in certain situations. For the purposes of this tutorial, we’ll keep our polys four-sided.
07. Adding details and creating the arms

(Image: © Vectron3D)
Let’s move on to the arms. If we were attempting to rig this character for animation, you may have fewer, more evenly spaced loops around the elbow joint, but in this case we can add a few more to help accommodate the stylised creases on the sleeves.
At the shoulder, select the outer loop, and extrude some polygons out and down from the body. Repeat this process for the upper part of the thighs as shown below. Turning on symmetry will again allow you to do both sides simultaneously. Make additional loops using the Loop Cut tool for details like creases to the sleeves and caps on the shoulders.
08. Making the gloves
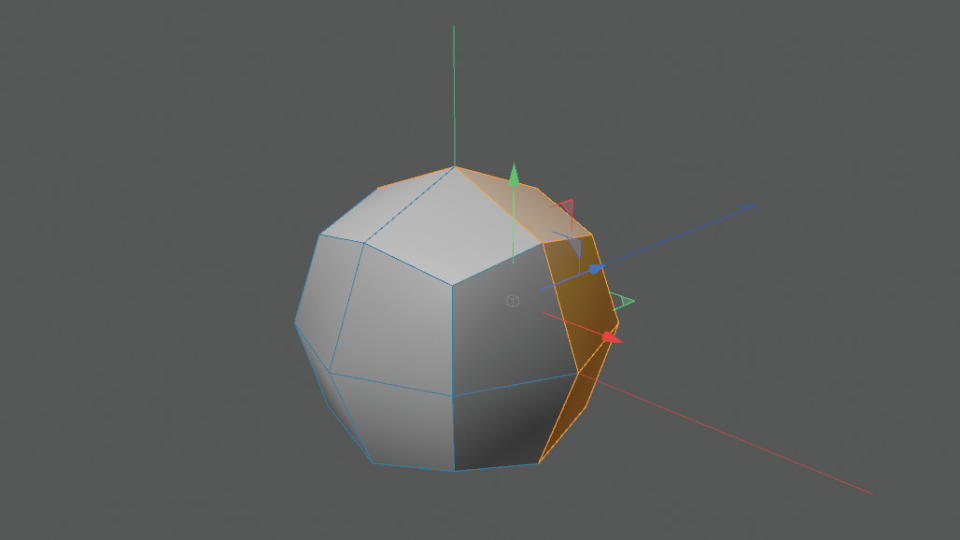
(Image: © Vectron3D)
We’re going to start this with a hexahedron sphere with eight segments. You’ll notice when creating the helmet earlier that a regular sphere was used, as the topology and flow of the polygons suited the shape of our design better. This is the same situation; we can take advantage of the quad-base topology of a low-poly hexahedron sphere. Select the rear half of the sphere, shown in yellow, and delete it.
09. Creating the fingers
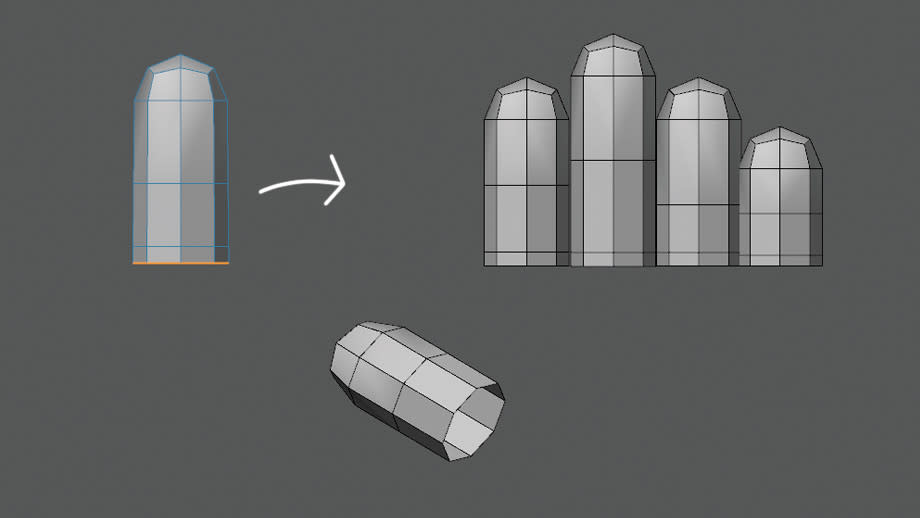
(Image: © Vectron3D)
Now with half a sphere, switch to the Loop Selection tool. Select the edge at the open end and extrude it to add length and form the finger. Alternatively, you can also use a cylinder, or better yet a lower-poly capsule.
Add some additional edge loops to even out the mesh, then while holding Ctrl, right click and drag the sphere in the Object Manager down and release to duplicate the object. Do this for the remainder of the fingers and the thumb, and adjust the length accordingly for each.
10. Creating the glove's body

(Image: © Vectron3D)
Now the base elements are all built, I can move on to the body of the glove. Let’s begin by extruding some polygons out from the edge of the index and pinky fingers. Grab a disc from the Primitives menu, give it 18 rotational segments and two disc segments, and delete the centre. Rotate it 90 degrees and scale the disc on the Y axis to squash it. Position it roughly at the base of the palm; we want the glove to look short and stubby. Make sure you’re happy with the position of everything before moving on to the next step.
11. Connecting the elements
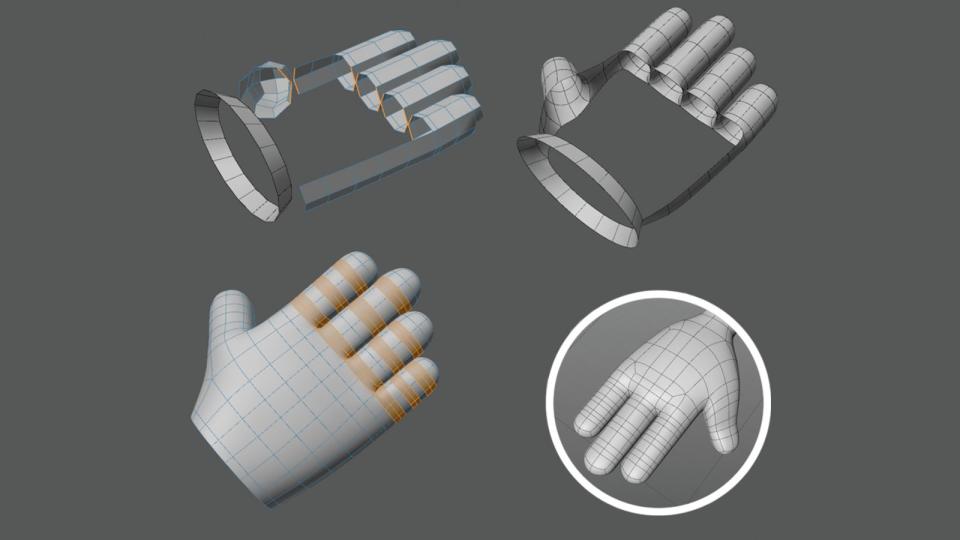
(Image: © Vectron3D)
With the foundations laid out for our gloves, I next combine everything and fill in the gaps. Start by selecting the separate meshes in the Object Manager and use the ‘Connect Objects and Delete’ command. Select the edges on the fingers as shown above and weld them together with the ‘Stitch and Sew’ tool. Repeat this for the other edges leading to the base of the glove. Add additional edge loops to the fingers and thumb at the joints.
There are multiple ways of sorting the topology on hands, and in our case gloves. The one you choose will be dependent on a variety of factors; for simple cartoonish hands like these our approach is simple and works great for what we need. Another example, circled above, may lead to a cleaner deformation as the fingers aren’t attached to each other at the base, but risks leaving a gap between the fingers when the hand is closed.
12. Detailing the gloves

(Image: © Vectron3D)
Now we have our glove modelled we can get on to the fun part of adding the details, but nothing too crazy as we still want to achieve that stylised look. Select the polygons in the centre of the glove, do an inner extrude with the Inset tool, then extrude them towards the palm. Model some simple raised details with standard cubes.
Extrude an edge from the wrist and add some additional loops with the Loop Cut tool. Select and rotate these to create the creases, and add some control loops to tighten them. Finish up by modelling a simple connector from a disc, extruded with caps.
13. Lowering the body
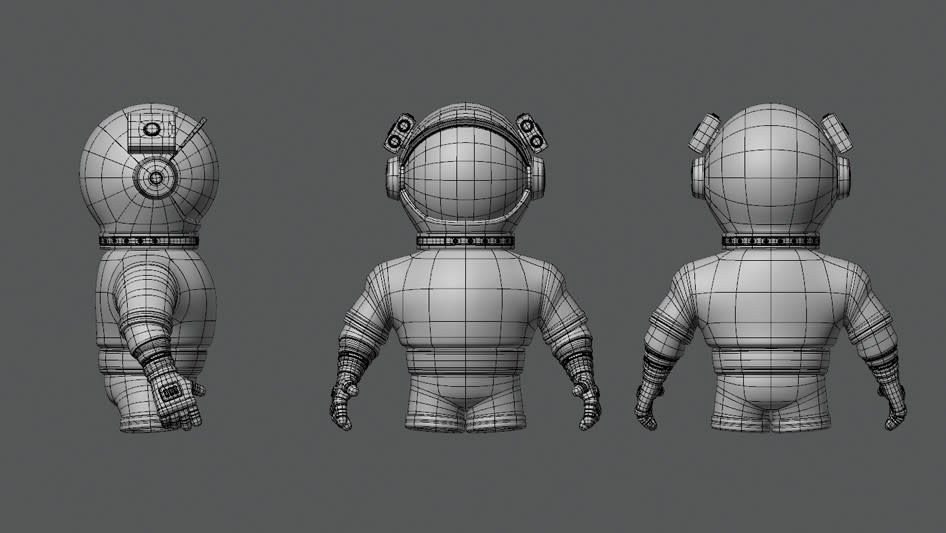
(Image: © Vectron3D)
Now that I've modelled the upper body of the astronaut, I can progress on to creating its lower half. The process for constructing the legs will be similar to that we followed for the arms, although in this instance I don’t need to actually physically connect them. The model isn’t going to be rigged, so it will be easier posing them at the end if the legs remain separate.
14. Modelling the legs

(Image: © Vectron3D)
Grab a cylinder, give it eight rotational segments, four height segments and no caps. Hit ‘C’ to make it editable, select the edge loops and scale them to get the general shape. I add some additional loops to create the creases and then add some control loops to tighten them. Position the leg inside the upper thigh section we created earlier and mirror it, don’t worry about combining these, they can remain separate objects.
15. Building the skates
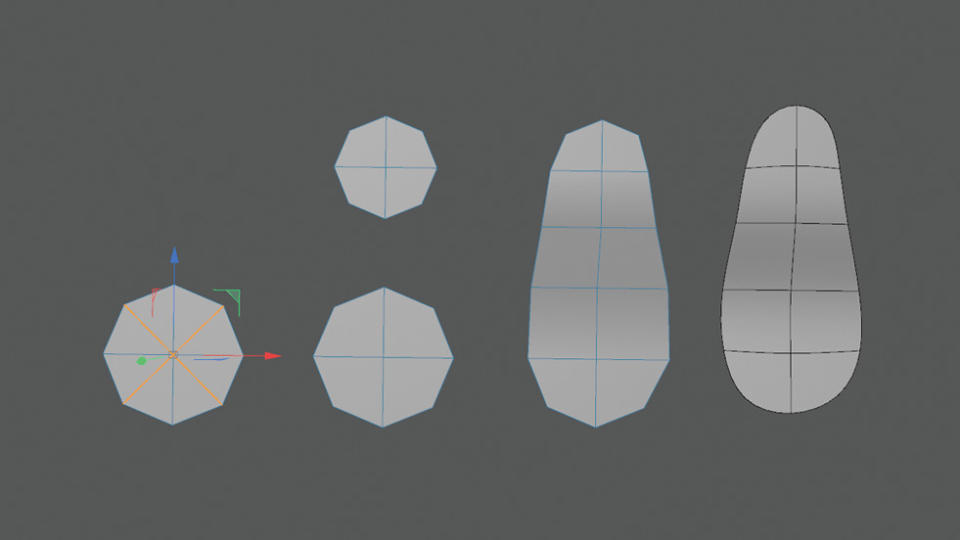
(Image: © Vectron3D)
I want to finish off the astronaut’s design by giving it the most epic pair of roller skates known to man. This time I start off with a disc that will need eight rotational segments and just a single disc segment. After making it editable, I select the four horizontal edges and melt them by pressing U+Z, and then duplicate the disc and scale it slightly. I then select both objects in the Object Manager and combine them. I switch over to the Polygon Pen and bridge some polygons between them.
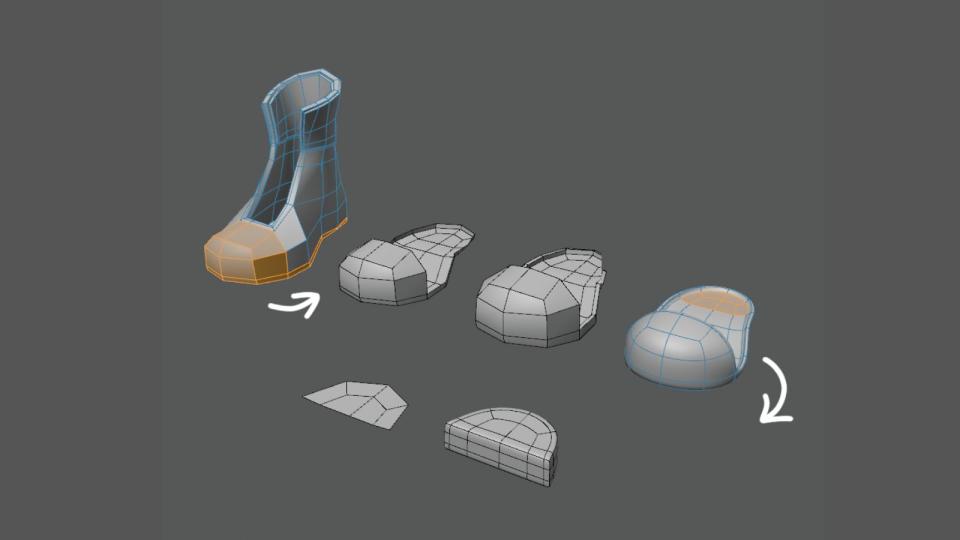
16. Making the boot
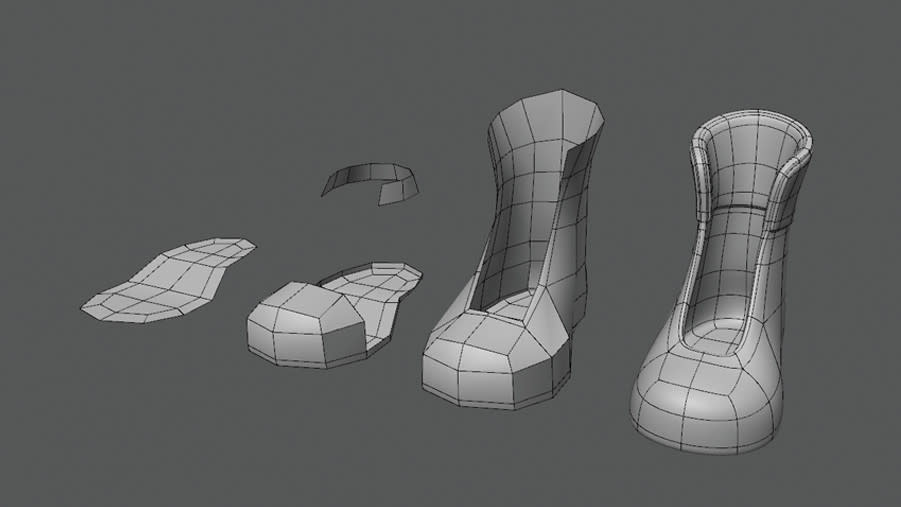
(Image: © Vectron3D)
Using what I prepared earlier, I select the front and extrude it with caps. Delete the extra unwanted faces on the back and Align/Reverse Normals. Use the Loop Cut tool to add an edge loop at the base, and then select the remaining perimeter edges and extrude them, this time without caps.
Use the polygon pen to weld the unconnected edges to the edge loop that you just made. Now take a disc with 10 rotational segments and delete the front two polygons to form the neck of the boot. Combine both objects and use the Polygon Pen to fill in between. Finish off by giving it some thickness.
17. Creating the sole and heel
(Image: © Vectron3D)
Using the boot modelled in the previous step, make a polygon selection as in the image here and split it. Add some thickness to it by selecting the mesh and extruding it with caps enabled. Repeat this process on the back of the mesh. When making the heel, as indicated in the image again, finish up by adding some supporting edge loops with the Loop Cut tool. These don’t need to be connected and can remain separate objects.
18. Adding ankle support, tongue and laces
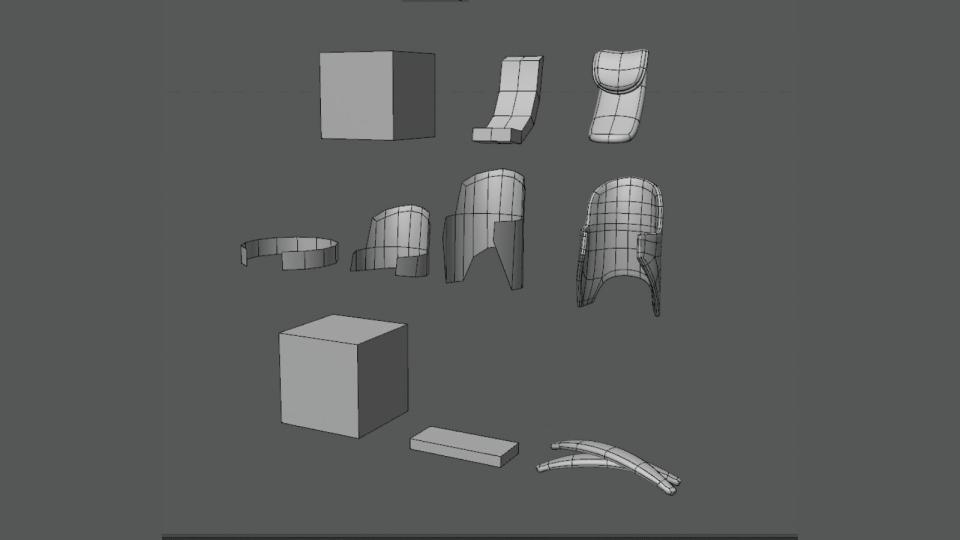
(Image: © Vectron3D)
For the tongue of the shoe, grab a cube and scale it on the Z axis, add some additional cuts, and rotate the sections to the desired shape. Select the top and bottom faces, inset them by pressing ‘I’+’M’, and extrude them.
We’ll need a cylinder for the ankle support, which must have 14 rotational segments and no caps. Scale it to the appropriate height on Y and delete two polygons at the front. Make an edge selection on the back, then extrude and pull these up. Add extra loops to even out the mesh, and when you’re happy with the shape, add some thickness by extruding it with caps.
For the laces, scale a cube on Y, add some additional segments on X and shape as needed.
19. Modelling the baseplate
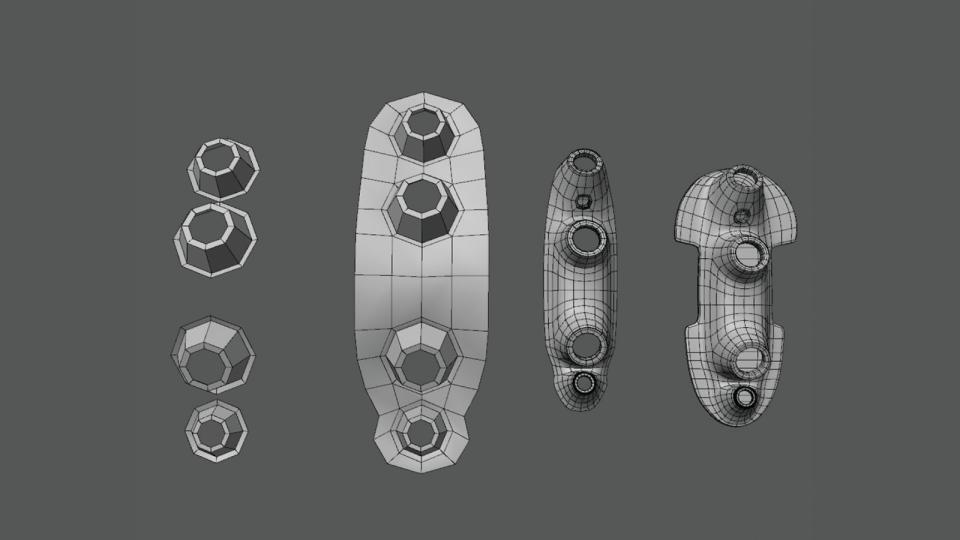
(Image: © Vectron3D)
Use a disc or cylinder with eight rotational segments, inset the centre, and remove it. Make a copy while the mesh is selected in the Viewport to get a duplicate without making a separate object. Position it and repeat the process for the other three sections.
Use the Polygon Pen to bridge polygons between the cylinder and discs. Loop select the outer edge and extrude it, drop the mesh into a subdivision modifier set to 1 and make it editable. Use the increased geometry to cut a small hole for the trucks.
20. Crafting the trucks and wheels
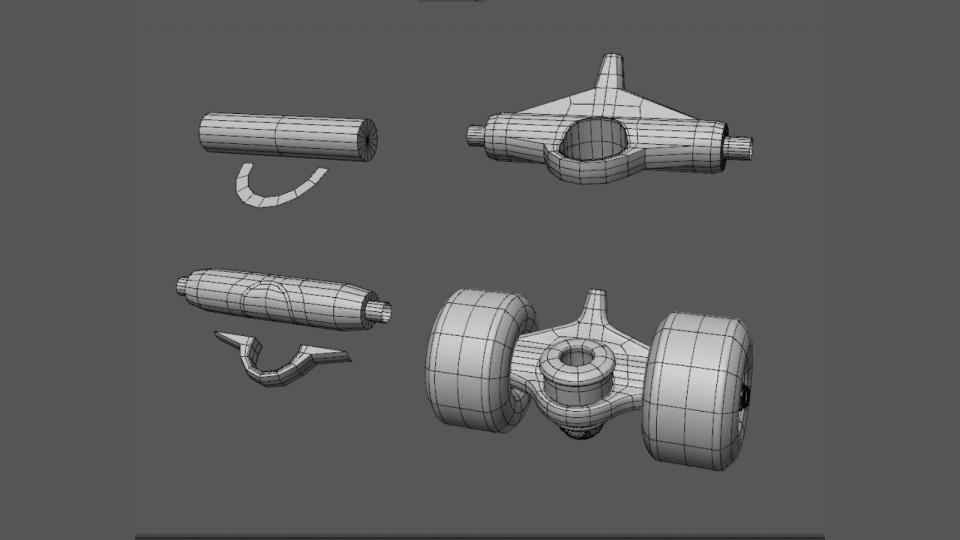
(Image: © Vectron3D)
The final component for the roller skates is to model the trucks and wheels. Although this looks intimidating at first glance, it can be simplified like the rest of our model by breaking it down into sections. Get a sphere, give it 16 rotational segments, add a disc with the same number of rotational segments and then delete half of it.
On your cylinder, add an edge loop either side of the centre one. Next make a circular cut to the side of the cylinder. The Fit Circle tool can be a little finicky, so an easy solution for this is to instead use another cylinder as a template with snapping enabled and cut around it.
Select the polygons inside the circle and extrude them inwards with the Inset tool to create a border loop. Delete the selected polys and use the Polygon Pen to bridge the top and bottom edges of the hole together with polygons, and connect the half disc piece to the front after extruding it with caps. Extrude the rear part of the truck out from the surface and finish by modelling some simple wheels and washers from a cylinder.
21. Adding the finishing touches

(Image: © Vectron3D)
Finish the roller skates by adding extra little details like the logos on the sides, brakes on the front and eyes for the laces, which can be made from a low-poly torus. If you haven’t already, make sure to group all of the individual objects that make up the skates, as well as the other parts of the model such as the torso, legs and helmet to keep everything tidy and organised. Move the skate into place at the ankle and mirror it, adding any final bits of details to the model you want, like the chest panel on the front.
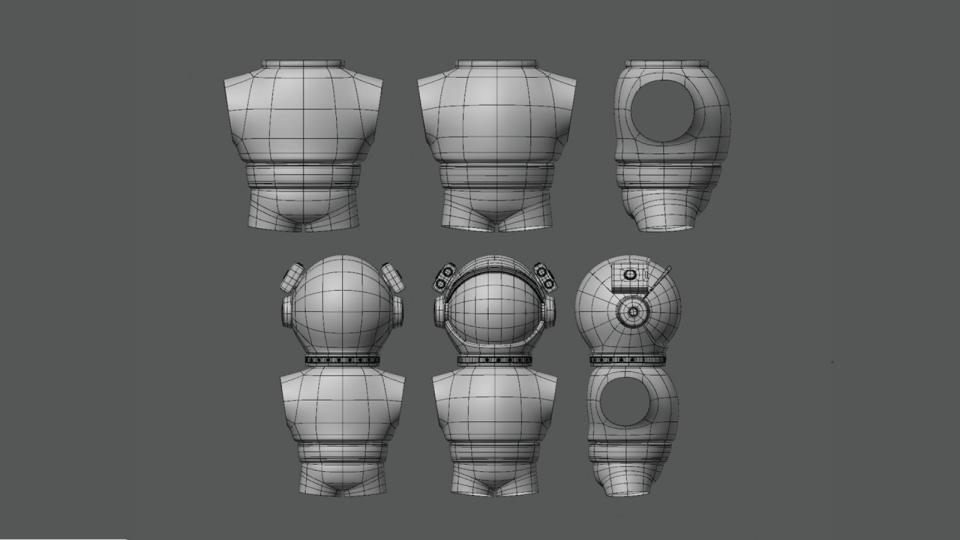
22. Final thoughts
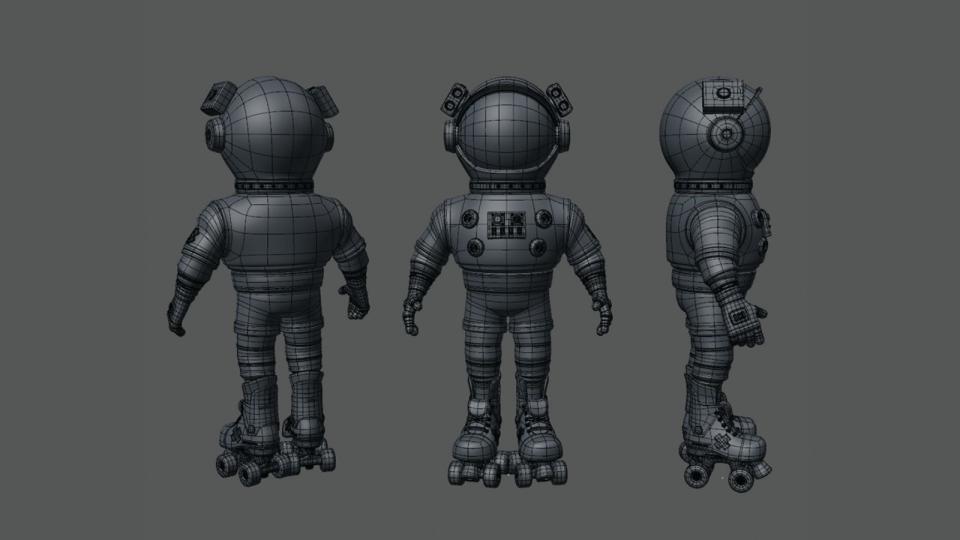
(Image: © Vectron3D)
With the last pieces now in place, our model is complete! Hopefully you’ve learned a range of techniques and methodology that will help you to progress in your modelling journey along the way. Breaking any model down into smaller chunks can help to make even the most challenging of creations more manageable, giving you the ability to lay your topology out as you go, make any necessary adjustments on the fly, and blockout your model more easily for a smoother workflow.
Character design in Cinema 4D: quick tips
Here are a few more quick tips to keep in mind when you're designing characters in Cinema 4D, or other similar programs.
01. Advice for modelling characters and clothing
When modelling a character, the rule of thumb is that unless it's going to been seen, get rid of it. As with our astronaut, the body won’t be seen, so there’s no need to have one underneath the suit. Doing so can cause unwanted intersections, overlaps and generally make it harder to rig.
02. How to plan topology
When planning your topology, think about how you want the geometry to fl ow and how it serves the model for its intended purpose. Not all quads are created equal, and just because it’s quads doesn’t mean it’s suitable for the task at hand. This is especially important when modelling for animation.
03. Tips for modelling with subdivision
Subdivision allows you to use fewer polygons and less geometry to describe a curve. Take advantage of this by considering your polygon density, and starting on the lower side and adding in geometry as you go. Starting too dense can also make your mesh diffi cult to work with.
Get more tutorials at 3D World
This content originally appeared in 3D World magazine, the world's leading CG art magazine. 3D World is on sale in the UK, Europe, United States, Canada, Australia and more. Limited numbers of 3D World print editions are available for delivery from our online store (the shipping costs are included in all prices). Subscribe to 3D World at Magazines Direct.

