Elden Ring: Shadow of the Erdtree — 3 tips to get you started
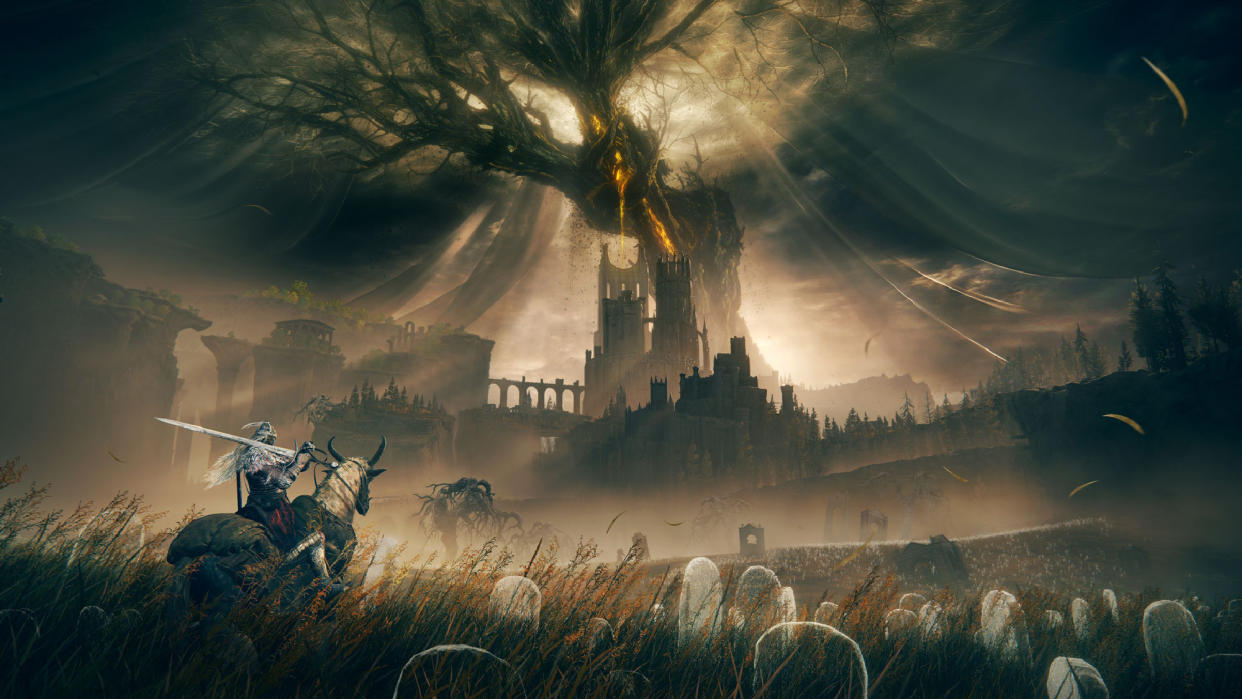
Elden Ring: Shadow of the Erdtree is almost here. The Land of Shadow beckons wary travelers into its dark midst, wherein dangers of enormous stature lurk in wait to utterly demolish those who oppose them.
But stand tall, my fellow tarnished, as we at Tom's Guide are here to provide you with ample support on your quest through these forgotten realms. Before diving headlong into this new world underpinning the great Elden Ring, there are several prerequisites you might want to consider first.
Even the most daring Souls veterans will need a bit of preparation for what's in store in this expansion. With a potential run time of nearly 30 to 40 hours, Shadow of the Erdtree is sure to keep you busy in your hard-fought attempts to reach the menacing Mesmer, the Impaler.
So sharpen your blades, equip your best talismans and follow along with us as we detail everything you need to know to prepare for this exciting return to one of gaming's most enticing expansions.
General DLC prerequisites
Shadow of the Erdtree will surely test the patience of many tarnished. Be that as it may, you should aim to have your character properly ready for everything this expansion will throw your way. People who have already played the DLC say you should ideally strive to be between level 100 and 150. Keep in mind that PvP is typically capped at 125.
Thus, being properly leveled is a gold standard for success in Elden Ring. The game is quite a challenge, and you can expect its expansion to be just as (if not more) brutal than the base experience. So you may want to level yourself up even higher, but note that the DLC has an opt-in approach with a new leveling scheme.
I won't get into spoilers, but you'll want to be properly situated for the DLC in terms of your stats. Luckily, this isn't Dark Souls 2, so you won't have to invest a ton of points into ADP. However, it is recommended that you get your Vigor (health) up to at least 50 or even 60.
I'd recommend stocking up on several consumable items, namely Rune Arcs, Larval Tears, and varied Boluses (Stimulating Boluses primarily). You'll also want to nab all of the cookbooks scattered across the Lands Between so you can always craft any consumable you're missing when traversing the Land of Shadow.
There are a few buffs in the game that should also make your time in the DLC less stressful. For starters, make sure you have Golden Vow. It can either be found as an ash of war or as an incantation — the latter being the better of the two variants, gifting you increased damage negation and attack power.
Another great buff to have is Flame, Grant me Strength, an incantation that lasts just 30 seconds allotting 20% Fire and Physical damage negation in tandem with 11% Stamina recovery. Last but not least, Blessing of the Erdtree will serve you greatly as a powerful healing spell that restores 12HP per second for 90 seconds.
Several talismans should also be sought out for an improved build. I recommend the Great Jar's Talisman, Erdtree's Favor Talisman, Winged Sword Insignia, and Dragoncrest Greatshield Talisman. You may also want to ensure you have all of the Crystal Tears for your Wondrous Physick before proceeding into the Land of Shadow.
Infinite upgrade materials
With the DLC comes an arsenal of interesting new weapons to try, which will corral as many as 100 new variants across an additional eight new weapon types. That means you're going to need a ton of upgrading materials — you know, those smithing stones you pick up and totally forget you have in your inventory.
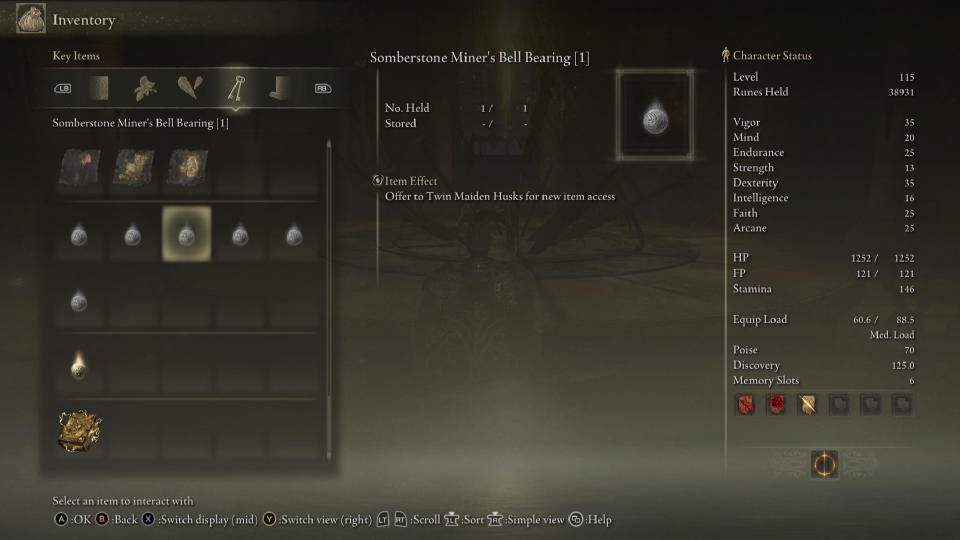
Elden Ring has two different types of smithing stones; Somber and regular smithing stones. To get an infinite amount of these so you don't have to consistently keep searching them out in the overworld, you'll want to acquire the nine total bell bearings to give to the Twin Maiden Husks in the Roundtable Hold.
It's here where you can purchase these upgrading materials ad infinitum, which is quite helpful for those accruing a multitude of exciting new armaments to try. This way, if you upgrade something to its fullest (or close to its fullest) and find another new weapon that better meets your fancy, you'll have plenty of materials and won't have to stress about reacquiring them.
Below are the locations of the five Smithing Stone Bell Bearings and four Somber Bell Bearings:
Smithing-Stone Miner's Bell Bearing 1: Dropped by Crystalian boss of Raya Lucaria Crystal Tunnel in Liurnia
Smithing-Stone Miner's Bell Bearing 2: Sealed Tunnel in Leyndell Capital Outskirts, Altus Plateau
Smithing-Stone Miner's Bell Bearing 3: Zamor Ruins in the Mountaintops of the Giants
Smithing-Stone Miner's Bell Bearing 4: Dropped by Godskin Duo boss in Crumbling Farum Azula
Somberstone Miner's Bell Bearing 1: Dropped by Fallingstar beast of Sellia Crystal Tunnel in Caelid
Somberstone Miner's Bell Bearing 2: Dropped by Crystalian Duo boss of Altus Tunnel in Altus Plateau
Somberstone Miner's Bell Bearing 3: First Church of Marika in Mountaintops of the Giants
Somberstone Miner's Bell Bearing 4: Tempest-Facing Balcony in Crumbling Farum Azula
Somberstone Miner's Bell Bearing 5: Down the lift before Beside the Greatbridge Site of Grace in Crumbling Farum Azula
Unfortunately, you won't be able to get an unlimited amount of the final upgrade in both tiers. Those are the Ancient Dragon Smithing Stone and Somber Ancient Dragon Smithing Stone, of which there are only a total of 13 and eight (respectively).
You can find all 21 stones in the following ways:
Complete Sellen's Quest by siding with Jerren
Defeat or give Gurranq 9 Deathroot in Bestial Sanctuary
Inside a giant skull south from Church of Repose in Mountaintops of Giants
Defeat first encountered ancient dragon in Crumbling Farum Azula
On floating platform north of Dragon Temple in Crumbling Farum Azula
Defeat ancient dragon summoning lightning in Crumbling Farum Azula
Complete Nepheli Loux Quest
Purchase from Gatekeeper Gastoc following Nepheli Loux Quest
Defeat dual Night's Cavalry near Inner Consecrated Snowfield Site of Grace in Consecrated Snowfield
Yelough Anix Tunnel in Consecrated Snowfield
Found on corpse above Great Wyrm Theodorix in Consecrated Snowfield
In front of statue near Halligtree Town Plaza in Miquella's Haligtree
In chest after Loretta boss encounter in Miquella's Haligtree
In stone gazeebo near ancient dragon summoning lightning in Crumbling Farum Azula
Defeat NPC invader Anastasia, Tarnished Eater in Consecrated Snowfield
Complete Latenna's Quest by delivering her to Apostate Derelict in Consecrated Snowfield
In chest under statue near Dynasty Mausoleum Midpoint Site of Grace in Mohgwyn Palace
In chest after Prayer Room in Elphael, Brace of the Haligtree
Complete Millicent Quest after defeating Malenia, Blade of Miquella and inserting needle into Malenia's secret flower
On corpse near gargoyle and giant dragon in Leyndell, Ashen Capital
Bosses to defeat
Elden Ring is home to a plethora of bosses to defeat, but Shadow of the Erdtree will require the slaying of just two such great enemies. Specifically (as per FromSoftware boss himself Hidetaka Miyazaki), Starscourge Radahn and Mohg, Lord of Blood will both be required killings for those attempting to access the Land of Shadow.
Mohg makes perfect sense, given that he stands guard to the DLC's main entrance, which will be Miquella's Egg, stolen from its perch within the Haligtree. To get to Mohg in Mohgwyn Palace, you'll need to either complete Varre's quest, a relatively fun one that introduces you to the world of invasions, or simply traverse to the Consecrated Snowfields and pass through the waygate not too far from the Yelough Anix Tunnel.
As for Radahn, he should need no introduction. His defeat brings a major change to the literal environment of Elden Ring and also directly correlates to several NPC questlines. You'll most likely find this monstrous foe organically, though, for those who haven't, he's located at the southern edge of Caelid on a sweeping battlefield just below Redmane Castle.
Both of these bosses are known for their difficulty, so to be ready for a fight. Mohg will require the use of the Purifying Crystal Tear for your wondrous Physick, allowing you to survive his dangerous second phase blood ritual attack. This item can be scooped up after defeating Eleonora, Violet Bloody Finger at the Second Church of Marika in Altus Plateau.
Mohg is pretty weak to blood damage, despite his use of this very same effect. He's also vulnerable to pierce, slash, standard, and strike damage, so a combination of all these attacks should prove promising — just make sure not to use any fire, as he's strong against it.
Radahn, on the other hand, is far more of a powerhouse, sporting an incredibly large pool of health and much fewer vulnerabilities. The best approach is to leverage pierce and scarlet rot, as he's weakest to these types of attacks. However, don't try to use any holy or sleep damage. You can also summon a variety of NPCs to help in your fight against this monstrous foe, so don't sleep on the help.

